Hi, if you’re reading this, this means that you’re a new intern! First, I want to welcome you aboard :D I hope you can earn new experiences in various fields.
Then, I need to clarify that you will be using Excel a lot! During career life anyway, not only in Asia to Japan, you will have to learn it either way so might as well seize the chance. Only the basics should be good for now.
During my intern days I was working in the Japanese Classes Department, and this Manual will focus mainly on the tasks I was doing.
But before starting, there are some terms I’d like you to know!
Darwin: this is just the name of our system, totally has nothing to do with Charles Darwin the biologist.
Napoleon: this is the name we call Success Stories, articles about the students who’ve gotten a job offer in Japan through us. We interview them, ask some questions and write their story with Japanese language starting from what sparked their passion up to the point they received the job offer, and it's not related to Bonaparte.
More terms are to come later, but we will get through them one at a time.
You need to put into your mind what we do, through the program FAST OFFER, we get students to learn Japanese from N5 to N3, we get them to have interviews with companies, and finally they go to Japan to start working.
Our role is very crucial, without them learning Japanese, none of the next steps will be possible.
So, let’s start:
Basic Darwin Navigation:
You must know the basics; Darwin is our system and you can access student’s data and much more.
Your first glimpse, you’d think Darwin is so complicated, but no, it’s just a matter of getting used to it.
You will mainly use 2 menus, 学生 and specifically 学生一覧 which means students list, and 日本語授業 Japanese classes.
Students List 学生一覧
Let’s start with 学生一覧, what you see in front of you is every student we have in our database, you will notice that their name is written and next to it there’s a number between Parentheses, that’s their ID, every student has a unique ID and we mainly use it to refer to the student in almost any occasion, because some students have similar names, but never the same ID, we call it FO ID (Fast Offer ID)
Try to copy the ID of any student in your screen and paste it on your search bar top-right of your screen and hit enter or the search icon. You will find the list has turned to show only that specific student. That’s how we look for students, and if you want to look for 2 or more students, you copy their ID’s and just put space in-between (ex: 45000 45001 45002) with no “ , “ or anything, just a space between every 2 ID’s.
Good, now look what Data we have on each student, there is almost everything you might need, their email, university and their major, phone number, or which 日本語授業 they’re registered to, etc… and we have their Phase フェーズ… What is a Phase?
Remember what we do, we teach Japanese, match students with companies for interviews, and let them go to Japan after getting the offer. So, imagine each step a phase, or you can also imagine phases are like folders, splitters to organize students into their places.
We have 4 main phases: FO JP, Fast Offer International and 日本語授業 and since we you’re probably working in the Japanese classes department, you will mainly use 日本語授業 Phase. Each phase has many sub-phases, or we call it step-phase!
And if you clicked on any student’s name, you will get even more information.
Search Criteria 検索条件
You can find this panel on your left.
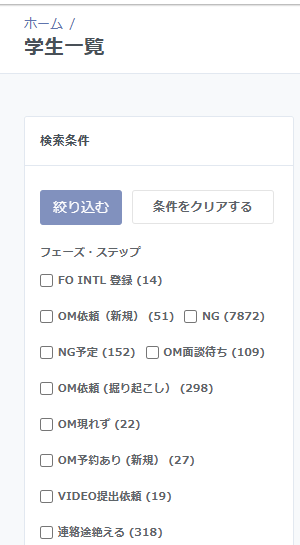
We use this option to filter out students depending on certain criteria, mostly by the Phase-step フェーズ・ステップ. To filter, Check the Checkbox of the Phase-step you're aiming at and click 絞り込む
but there are more options available if we scroll down a bit.
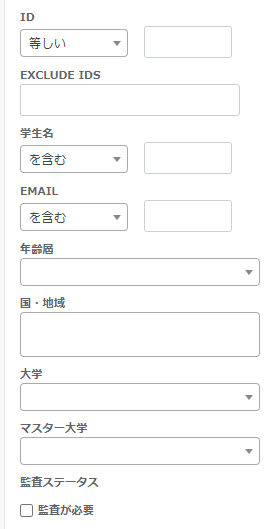
For example, you can filter out a certain range of IDs or a specific country or University, etc.
However, it's not always accurate, especially in University's names, because it can be written in different ways and each way is understood by the system as a different University. So I recommend sticking to the Phase-step method unless you have to.
Japanese Classes' List 日本語授業一覧
You can find it from the menu ribbon under 日本語授業, this list is basically every Japanese Language class we have since existence.
Each class has its name, time zone, starting and finishing day, this is the basic information. Now click on one of the classes and scroll down.
学生
学生 is the students enrolled in that class, you can add students through the button 新規学生の追加 then add by ID. Or you can remove students 削除 if they want to 離脱 withdraw from the class. But make sure to ask them why do they want to leave first, just to see if they have any complains we can solve and make the overall experience better.
レッスン
These are the lectures of the class, shown by date and you can add, remove, edit any of them if needed. Imagine the case of cancelling a class or rescheduling.Reflections
We have a system called Reflections, or Comments コメント in which we ask the students to write a comment after each class, this comment can contain what they’ve learned and gained this lecture. And this is very important, because it shows the commitment of the students, also their future employers can read all their comments to see their progress and to get a general idea of their way of thinking.
Reflections open automatically after the classes, and closes automatically 24 hours after the class, so make sure to inform the students to send out their reflection before the time is up. You can re-open the reflection just in case any error occurred but generally they have only 24 hours to send their comment.
Flow of the Classes:
The generally taken course is every major class is split into 2 sections, starts with a trial period 試し期間, which is less hours than the rest of the class. if the class is 200 hours, we can have 50 hours as a trial period, and it varies of course. The trial period is where we expect the numbers to decrease, the Japanese Language is hard and we know it, not everyone has the enthusiasm to dedicate to this course, thus, by the end of every trial period, the sensei sets some kind of exam to cut the students off, filter only the ones who will be able to continue the course.
Sending emails:
Sending emails is a baisc skill that you need to acquire since day 1.
On several occasions, you will need to send emails to some students, for example to ask them to schedule an interview with you, or to remind them that they have to do certain thing like join a WhatsApp group.
First, you need to specify who are you sending emails to? You can specify them by their Phase-step, or by their ID or any other way.
Say for example you’re sending emails for 10 students telling them to join your WhatsApp group for a certain class.
You will need their ID’s; you can get them from the Attendance Sheet of the class. Then copy the ID’s and paste them into the search bar of Darwin and hit enter.
Students should be filtered showing only the 10 students you specified.
Then you select to whom you’re sending the email, but in that case, you’re sending to all 10 so press select all すべてを選択
Press メール送信 (send emails) button on the top right, this screen will pop up.
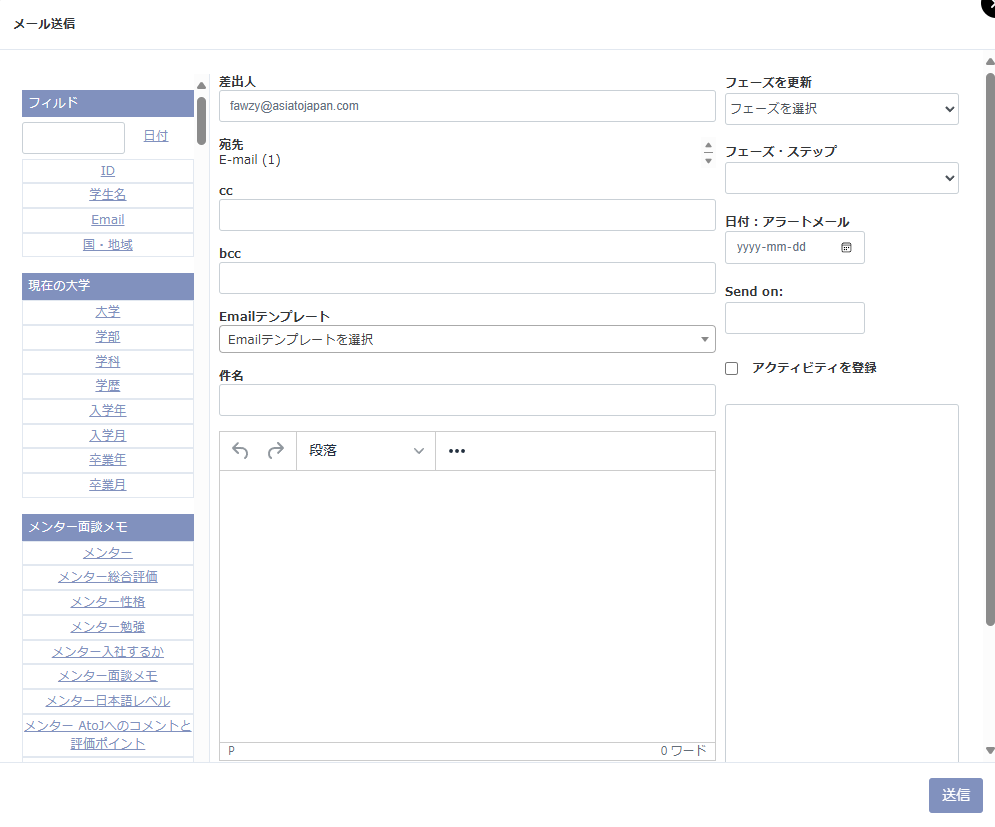
As shown in the picture, everything is straight forward, except few things, let me explain.
Notice that you need to check that your email will be send to the correct number of people! If you’re sending to 10 people, the 宛先 should show E-mail (10)
The fieldフィルド, we have several fields, like the ID or 学生名 which will be used to most. This is used to have the name of the student or their ID written automatically for each one.
If you wrote, “Hello, {{FIELD: name}} ID: {{FIELD: id}}” this will be sent to each 宛先 with their name and ID, so we don’t have to send 10 individual emails.
Then we have on the right side フェーズを更新 (renew phase), this means that by sending this email, the phase will be changed, in which case will this be useful? You might be asking, imagine sending a rejection mail, wouldn’t it be more convenient to change the step phase to “NG phase” at the same time?
In many cases you will only want to send the email without changing anything so might as well leave it as it is.
Finally, press 送信 and emails should be sent.
Creating a Class
Upon each recruitment, we create one or more Japanese Language Class, and you will be asked often to do it, so let's see how.
Creating a class is mainly 2 steps.
- Creating a class page on Darwin.
- Setting Zoom.
- Creating an attendance sheet
1. Creating a class page on Darwin.
Go to 日本語授業一覧 and press 新規作成 on the top right.
The fields are pretty much self-explanatory, You have Class name 日本語授業名, Starting day 開始日 and Ending Day 最終日.
What I want to highlight is to make sure to select the correct Time-Zone, if the class is in Egypt, you select Cairo, if in India you select New Delhi, and if you don't know what time zone is the country you're trying to input its Time-Zone, just google the name of the Capital of this country or the name of its Time-Zone.
Make sure you don't check 非表示 or 非アクティブ, and you can ignore リンク, JOB名, and Teacher IDs, you will not be using them, and if you will, you will be told explicitly.
Then scroll down completely ignoring 継続学習コメント section to set the schedule of the class.

Check the days of the class, then set the starting and finishing time of that day. The time will of course be identical to the time zones.
2. Zoom Setting
You will receive an email and password for a premium Zoom account. login (with the web version NOT THE APP), go to "Meetings" then "Schedule a meeting" then input your class schedule.
Make sure to set the time zone right and make it a recurring meeting for how many classes it will take, click "More Options" and turn Automatically record meeting OFF.
3. Attendance Sheet
Each class has its attendance sheet. making it is not a big deal as we already have a template that we copy and edit. You can find the template within this folder that contains all the attendance sheets. (Google drive link)
The template file is called 「日本語授業 」 出席名簿テンプレート, Make a copy of it and rename the copy with the class name.
In the first sheet, we input the student list, and their ID and set the schedule for each class as shown. the second sheet is for the workshop attendance. the third sheet is for the WhatsApp group, to check if all the students have entered the group chat. the fourth sheet is also the schedule which you will edit as well depending on the schedule you were provided.
Class Responsibility
If you are responsible for a class, what is expected from you?
- Checking the attendance
- Workshops
- Weekly reports
Checking the Attendance
Attendance can be taken in various ways. Normally we have the Sensei take it in the Attendance sheet you created, or you can take it depending on the Reflections students write every lecture. choose what works for that specific class. Note that taking attendance is very important, as it is used for statistics.
Workshops
You will be expected to do at least one Workshop per month. Workshops should be the fun part, the session that replenishes students' motivation towards learning.
In these sessions, you should focus on Conversational Skills and Cultural Knowledge Cultivation.
Attendance is optional but preferable, setting the Workshop time is up to you, pick a time that works for you and the students, you can use a Poll on their WhatsApp group to decide.
You can also reach out to other interns to help you host these Workshops, it's better to have multiple interns to help you especially if you will use break-out rooms to have the students make conversations for practice.
You can go creative with it or stick to the basic formula.
We have many previously made PPT in our Canva account that can be reused, the easiest to use are in Workshop Standardization Project folder.
Weekly Reports
You're ought to submit weekly reports for the calsses you're responsible for in Teams Group Chat 「日本語授業報告」関連
The template is simple, just replace everything as shown.
「授業報告」
- 授業のレベルとクラス名
- Activeな参加人数(クラス開始での合計人数)
※Activeの意味は出席あり合計人数 - 学生追いかけのステータスとID番号(追いかけの学生合計人数)
- もしあれば、授業の日の変更の報告
- ワークショップの開催日と終わりますと「ワークショップ実施済み」の連絡
- その他の報告事項
Pulling Data from Darwin (CSV)
As clarified before, we have a big amount of data for each student registered on our system (Name, University, Major, Phone Number, Email, etc.)
in many cases you will need to pull some specific data from Darwin into an excel sheet, easy to analyze and understandable. These occasions might be student screening 選抜, or you just want the ID’s for the students in a specific Step Phase to create the Attendance sheet.
- Have the students you want to pull the data from on your Darwin Page, either they’re specified ID list or a certain Step Phase, then click on (CSV) on the top right.
(This Time You Don’t Have to Click すべて選択) - Type the File Name in レポート名, this is how the file will be named when you download the Data.
- Select the Specific Data Fields you want. Mainly (ID, 学生名), Then Select the Data you want, commonly specially in the Screening (誕生日, 国・地域, 大学 1, 携帯, 性別)
- Then make sure you press エクスポート and not 保存してエクスポート
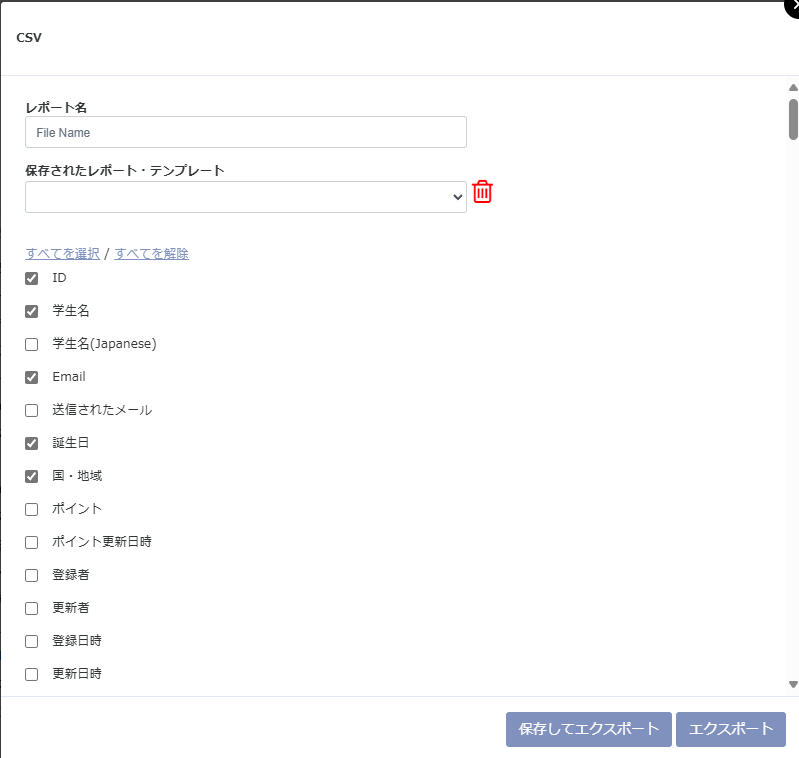
Note That if you’re doing a 選抜, you will need to select the same data fields over and over, that’s why there’s 保存されたレポート・テンプレート, templates which selects the data fields for you automatically and you can create your own template through the button 保存してエクスポート, that’s why you need to avoid it normally.
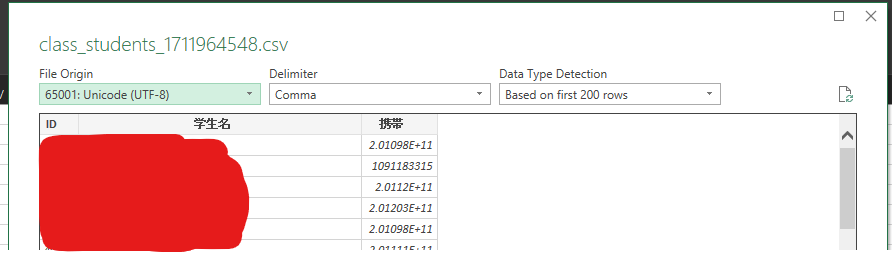
The file will be downloaded in a CSV format, to use it freely, open a new document on Microsoft Excel > Data tab> From Text/CSV … Make sure that the file origin is Unicode (UTF-8) and the Delimiter is Comma.